Showing posts with label Black Opague Embossing Powder. Show all posts

Friday, January 28, 2011

Happy Friday....

Happy Friday Buddies...
 
This weekend is a long time a comin'....it took so lone to get here.  I think all this snow that we're having here had slowed the week down....but as they say, " good things come to those who wait"....LOL!!!  Are you feeling my excitement for the weekend or what?...WooHoo!
 
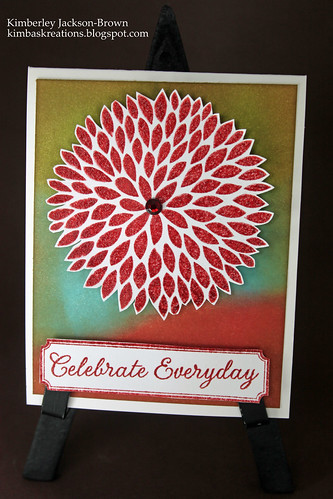
Okay, for today's card, I did yet another Tim Holtz's Distress the entire cardstock technique...I am lovin' doing this so please, bear with me...you may see a flux of card with this being done...LOL!  I created the background using Peeled Paint, Broken China, and Fired Brick.  With the simple background I wanted a striking focal point and that is where I used the LARGE SOLID FLOWER.  I also embossed the flower using clear embossing powder to give it some shine.  And of course...a card isn't a card without some bling...LOL!!!
 
Thanks so much for stopping by and have a great Friday and weekend!
Kimba:)
HOW-TO Instructions
Step 1: Base card measures 4.25 x 5.5 - White
Step 2: 2nd Layer measures 4 x 5.25 - Distressed Layer - Peeled Paint, Broken China, Fired Brick
Step 3: Stamp flower using FIRED BRICK distress ink. Heat emboss using clear embossing powder.  Cut out.  Add gemstone. Adhere to card.
Step 4: Stamp Label using FIRED BRICK distress ink and then stamp word sentiment.  Embossing using clear powder. Cut out. Adhere to card.

Friday, September 10, 2010

Happy Halloween.....

Good morning all...
Welcome to the weekend. It's FRIDAY!!!! And to kick off the weekend, I thought that I would do a fun card. This card was fun to make and it's primarily make up of squares. I hope you like this and that it inspires you to pull out those Halloween stamps and get crackin'.

Have a great weekend and thanks for stopping by!
Kimba :)


HOW-TO Instructions
Step 1: Base card measure 4.25 x 5.5 (BLACK)
Step 2: 2nd Layer measures 4 x 5.25 (WHITE)
Step 3: Punch out 6 squares - I used the McGill Blue punch-adhere to card (PURPLE)
Step 4: Stamp house image using Versamark ink. Heat emboss using Black Opague embossing powder. Punch out image and adhere to a scallop square. Use the PINK Mcgill Punch for the house image and used the PURPLE McGill Scallop Punch. Put Foam dots on back. Adhere to card
Step 5: Stamp out word sentiment and adhereto card.

Monday, February 15, 2010

CAARDVARKS Challenge! - Wedding Card Publication #5


Hello all-

LAST, but NOT LEAST is the final wedding card submission. THIS card is my favorite and I had the most fun making because I used Tim Holtz's Distress Inks. I am lovin' distressing now. I tell my kids they better watch out or I'll distress them...LOL!!!

I stamped the wedding image w/VersaMark in and then heat embossed it using BLACK OPAGUE embossing powder. I just LOVE this look because the image came out so clear, dark, and shiny. I tore the edges of both the wedding image and word sentiment and distressed both of them. I FIRST used WORN LIPSTICK and then on top of that, I used VINTAGE PHOTO. I added foam dots to that to adhere it to the tag.

Now the tag, I embossed using my CuttleBug using the TEXTILE folder and then used the same two distress inks on it. The 3rd layer (PINK CARDSTOCK) I used my HEIDI SWAPP EDGE DISTRESS tool and distress the edges, and then swiped it using VINTAGE PHOTO ink, I attached that using foam dots.

Again...I hope you enjoyed seeing my wedding submissions.

Thanks SO VERY much for always stopping by!
Kimba :)