Monday, January 31, 2011

Bike Card......

Happy Monday all-
 
I hope that you had a great weekend.  I know for me I am always sad to see it end :(....but I have to carry on...right?..LOL!!
 
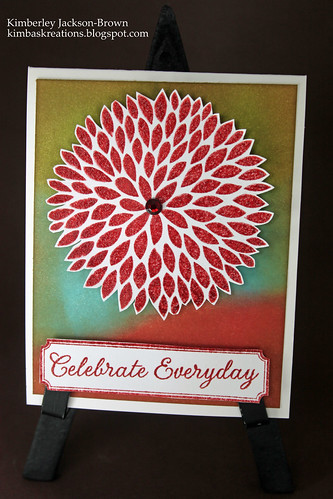
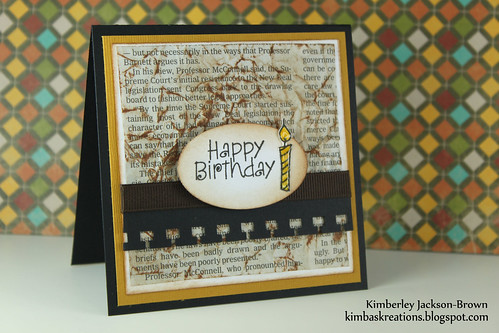
Well, today's card I created for a challenge that  I participated in over at HeroArts.com.  This is one of their 2011 NEW wood block stamps and I just happened to have won it in their blog hop "leave a comment" challenge.  When  I first got this stamp, as well as the others items I won, I was like, "now how would I use this stamp"...but low and behold...I was able to get this idea for this card and I love the way it came out.
 
I have been listening to the news and here in NYC we are expected to get another snow storm so that means lots of crafting...LOL!
 
Thanks for stopping by!
Kimba :)

Friday, January 28, 2011

Happy Friday....

Happy Friday Buddies...
 
This weekend is a long time a comin'....it took so lone to get here.  I think all this snow that we're having here had slowed the week down....but as they say, " good things come to those who wait"....LOL!!!  Are you feeling my excitement for the weekend or what?...WooHoo!
 
Okay, for today's card, I did yet another Tim Holtz's Distress the entire cardstock technique...I am lovin' doing this so please, bear with me...you may see a flux of card with this being done...LOL!  I created the background using Peeled Paint, Broken China, and Fired Brick.  With the simple background I wanted a striking focal point and that is where I used the LARGE SOLID FLOWER.  I also embossed the flower using clear embossing powder to give it some shine.  And of course...a card isn't a card without some bling...LOL!!!
 
Thanks so much for stopping by and have a great Friday and weekend!
Kimba:)
HOW-TO Instructions
Step 1: Base card measures 4.25 x 5.5 - White
Step 2: 2nd Layer measures 4 x 5.25 - Distressed Layer - Peeled Paint, Broken China, Fired Brick
Step 3: Stamp flower using FIRED BRICK distress ink. Heat emboss using clear embossing powder.  Cut out.  Add gemstone. Adhere to card.
Step 4: Stamp Label using FIRED BRICK distress ink and then stamp word sentiment.  Embossing using clear powder. Cut out. Adhere to card.

Thursday, January 27, 2011

SNOW---SNOW---and 19 inches later...

Good day my friends...

I hope that wherever you are that you are inside, warm, and free of snow...LOL!!  I woke up at 3am to see my entire street covered in a white blanket of snow.  At that point, I KNEW that the schools would be closed and they were.  I took some pics of the snow and it is just CRAZY!!! ...and now I hear that were are to get 3 more inches tonight and 5 more inches on Saturday....CRAZY huh?!!

If there is anyone out there who was hit with snow, please post a comment and pics ....I would love to hear about it and know that I am not alone...LOL!!!  Well, gotta run and get the kids dressed to go out and play - if you can't beat 'em...join 'em!!!  I will post the card for today later!!!

Thanks for stopping by!
Kimba :)

PS - Blogger is not allowing me to upload pics....I wonder if the snow has anything to do with it?....hmmmm...LOL!!!
This is my terrace..full of snow

My foot impression - look how deep!

Car that has not been dug out!

Across the street - look at the buried car

Picture I took from my terrace

Wednesday, January 26, 2011

Paint Dabber Resist Technique

Hello all-
Happy Hump Day all!  Is it just me or is this week going by sooo slow?  I love the weekends  and so I want them to get here so fast..LOL!
Today's card is a one layer card, and this is a type of card that I very rarely do...but it was super easy.  I love the way the it came out.  I used this technique that I saw Tim Holtz's do on one of his videos - he stamps an image using the paint dabber paint as the ink and then allows it to dry and then uses his Distress Inks on top.  It came out better than I expected.  Don't you just love it when that happens?
Anyway, thanks so much for stopping by!
Kimba :)
How-To Instructions
Step 1: Base card measures 4.25 x 5.5 - White Card stock
Step 2: Stamp the LARGE SOLID FLOWER - ink stamp up using Ranger's Silver Dabber. Stamp image and let dry.
Step 3: Distress the front of the card using Tim Holtz's Distress inks - Peeled Paint, Broken China, and Spiced Marmalade.
Step 4: Using a dry cloth, wipe off excess ink on the stamped flower image as see the image pop.

Tuesday, January 25, 2011

Striped Flower - Lovin' this Stamp


Hello all-
Hope you are having a great Tuesday. Here in NYC, it is starting to snow...yep...again so I hope that wherever you are, you are warm and toasty.


Today's card is featuring the flower stamp that I used on the card from yesterday. I am SO LOVIN' this stamp. It's called STRIPED FLOWER - CG255 by HeroArts. This stamps is so versitile. You can color it, paper piece it, collage it...it's just an awesome stamp. Here, on the card today, I stamped it on Pink Vellum using VersaMark Ink and embossed it using opague white powder and I love the effect. For the background, I distressed a piece of cardstock and then crumbled up the cardstock. I then distressed it again to show the wrinkles....love the way it came out as well.
As always, thanks for stopping by and please....leave me some "Comment Love" because I love to hear from you!
Kimba :)

Friday, January 21, 2011

Scrapbook Paper - Thinking outside the box....


Hello and Happy Friday!!!

I have been so looking forward to this weekend and here in NYC we just finished having 3-7 inches of snow - literally...the snow topped about 5 minutes ago - and you know what....I love snow just like the next one, but I am sooooo "snowed out"!  We didn't even get rid of the last snow storms snow and now there is snow on top of snow...LOL!!!  HOLY MOLY....but my kids are lovin' it!!!!

In any case, today's card is one of a set o cards that I have made.  I want to share a tip about the focus point on the card today that I am so excited about.  I sure wished (hind-sight is 20/20 now) I have taken a picture first...okay let me tell you my tip.  For this card, the DREAM BOAT picture was actually a piece of scrapbook paper that had 24 various Valentine's/Lovey Dovey stuff on it.  So, what I did was cut up each rectangle, created a mat, added foam dots and stamped a word sentiment.  I am going to show you two more card that I created - see below. 


I got this paper from Michael's and it was the LAST sheet, but I am on a mission to try and find more, and if I do, I will definitely post a pic.  And...because all the work was this great paper, I was able to create this card lickety split!...LOL!

Well, I hope you like the cards and that you will begin to look at your scrapbook paper in a different way-using the elements on the paper as focal points is an easy way to be able to create quickly as well as having beautiful results.

Thanks for stopping by and have a great weekend!
Kimba :)

Monday, January 17, 2011

Happy MLK Day!!!


Hello all-


Happy MLK Day!!!! I just want to first say just how grateful I am to all that Dr. MLK did to allow me to enjoy the simple freedoms of life. What am amazing man! He demanded change and because of him I get to be my true and authentic self.


Today's card was fun to make because I just love butterflies and in the spirit of "change", I think of them. They start off as catterpillers, but are transformed into something beautiful and amazing. I love the way the card turned out. I tried to keep it clean and simple.


Thanks so much for stopping by, and enjoy the rest of your Monday!
Kimba :)


Friday, January 14, 2011

U Rode Away.....with my heart


This is the inside of the card
 
HAPPY TGIF everyone!
My, my, my....this week just flew by for me....was it like that for any of you?  I have been pretty much confined to my bed because I caught a bug that knocked both me and my daughter out for the count.  I made this card in light of me feeling better...Yay!  Like I said, this week has flew by...how about in a couple of weeks it's gonna be Valentine's Day.....time is a movin' and a groovin'  on by...LOL!
Today's card is one that can be given as a Valentine's Day to that special someone.  I am going to give it to my son Jackson.  About 2 years ago, I started this tradition of all the kids and us parents too, giving each other Valentine's stuff - a card, some of those candies with the words "miss u", love u"....whatever, just as long as on that day, everyone feels the love!! I make them heart shaped pancakes and all....they just love it....so this card is perfect for my Jack...he sure did steal my heart away twelve years ago...
So, don't let time get the best of you.  Get to cranking out those card for that special day!  Have a great weekend and thanks so much for stopping by!
KImba :)

Tuesday, January 4, 2011

Glossy Accents-Best thing ever!!!

Hello everybody!
I am so excited to share with you this tool that I am ABSOLUTELY in love with.  So, in case this is NOT new to you, please bare with me as I share with the newbies...LOL!!
The tool that I love is called GLOSSY ACCENTS.  It's not a tool per say, like a trimmer or decoartive punch.  Instead, it is this cool liquid that you can add to anything to create a glossy embellishment.  I used the Glossy Accents on the cupcakes.  It gives it dimension and shine.  It is sooo easy to use.  All you do is cover the item with the Glossy Accents and then let it dry...and it dries rather quickly.  You can also use it as an adhesive and this stuff will hold ANYTHING!!!  It turns an ordinary paper diecut or stamped image into something awesome!!!!  Give it a try and please share with me how you like it!

Thanks so much for stopping by and have a great day!!!!
Kimba :)

Monday, January 3, 2011

HappyBirthday & HAPPY NEW YEAR!!!


Hello and Happy New Year!

I hope that you all had a great holiday with family and friends.  I still can't believe just how quickly the year had come and went, but I am looking so forward to 2011!!!

Today's card was a birthday card that I made for a friend.  I love the way it came out.  It has a masculine feel and for me, those type of cards are a challenge for me to create.  One of the coolest elements of this card, for me, is the newspaper layer.  I am trying to be more eco-smart and trying to recycle where ever I can, and using the NY Times was a great way to do just that.

Once I cut out the newpaper layer, I crumbled it up.  Next, I distressed the newspaper by rubbing it with Tim Holtz's Vintag Photo.  The ink made the wrinkles pop out and gave it texture and character.  I hope you try using newspaper on your next project.

Thanks so much for stopping by!
Kimba