Showing posts with label Fiskars Scallop Punch. Show all posts

Monday, February 14, 2011

HAPPY VALENTINE's DAY.....


Happy Valentine's Day!!!
Happy Monday and Happy "love" Day!  I hope that this day you share it with people you love - be it family, friends,  or your significant other - just make sure you enjoy and have fun!
Today's card was just that - fun to create.  The stamp is from HeroArts and it's called In The Garden K5353.  When I first got this stamp, I bought it more so because it's a HeroArts stamp than because I just loved it. I just love the company and their quality of stamps are awesome.  When I was creating this card, I wanted to have the image be the focal point and so much so that all that was left would be a simple sentiment.  I stamped the image and heat embossed it using white opaque powder.  I added the punched heart to show the little boy was giving his heart away or vice versa - how cute!
Anyway....this is the card that I plan on giving my hubby.  Remember, the "how-to" is below and please, leave me some "comment love".  I love hearing from you.  Have a great Monday and and even greater Valentine's Day!!!!
Thanks for stopping by!
Kimba :)

HOW-TO Instructions
Step 1: Base card measures 4.25 x 5.5 - White
Step 2: 2nd Layer measures 4 x 5.25 - Red - run thru the CuttleBug using the Swiss Dots Embossing folder
Step 3: 3rd Layer - Stamp image using VersaMark ink on black cardstock and heat emboss using white opaque powder
Step 4: Punch scallop edge and tie a bow.  Punch out heart on red cardstock. Attach to card
Step 5: Stamp word sentimemt

Friday, January 14, 2011

U Rode Away.....with my heart


This is the inside of the card
 
HAPPY TGIF everyone!
My, my, my....this week just flew by for me....was it like that for any of you?  I have been pretty much confined to my bed because I caught a bug that knocked both me and my daughter out for the count.  I made this card in light of me feeling better...Yay!  Like I said, this week has flew by...how about in a couple of weeks it's gonna be Valentine's Day.....time is a movin' and a groovin'  on by...LOL!
Today's card is one that can be given as a Valentine's Day to that special someone.  I am going to give it to my son Jackson.  About 2 years ago, I started this tradition of all the kids and us parents too, giving each other Valentine's stuff - a card, some of those candies with the words "miss u", love u"....whatever, just as long as on that day, everyone feels the love!! I make them heart shaped pancakes and all....they just love it....so this card is perfect for my Jack...he sure did steal my heart away twelve years ago...
So, don't let time get the best of you.  Get to cranking out those card for that special day!  Have a great weekend and thanks so much for stopping by!
KImba :)

Friday, October 29, 2010

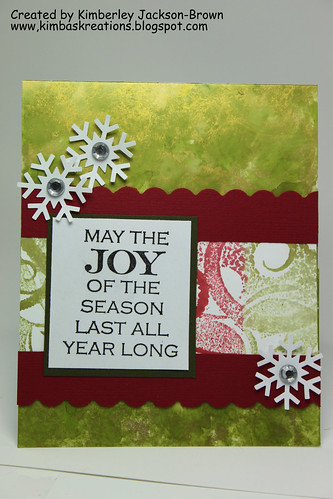
Joy Christmas Card

Joy Card - October2010B, originally uploaded by kimba7669.

Good Morning all----------

HAPPY TGIF!! HAPPY TGIF!! HAPPY TGIF!!

Can you tell that I am happy and excited that it's Friday??? TeeHee!!! The weekend is here and I have been waiting for it to arrive forever! I have so much stuff to do and today I am up early to get a jump on it!

So, today's card is one that I made to submit to a challenge and I love the way it came out. I am just LOVIN', LOVIN', LOVIN' Tim Holtz's Alcohol Inks. I love the process of how they blend once the ink hits the glossy paper and I especially love how you never seem to know what pattern is going to show itself. It's different every time.

On the background of this card, I used Alcohol Ink LETTUCE and GOLD. It gives such a shimmer when the light hits it. Perfect for the holiday season.

The center section, I did a technique that I saw HeroArts' Jennifer McGuire do. I used Tim Holtz's Distress inks. Here's what you do - you ink up the stamp using the Distress Inks. Next you spritz the stamp with water. Instantly, you see the Distress Inks get activated and you stamp the image on your cardstock. The end result is a water-colored image and I love it!!! Here's a link that shows Jennifer doing this technique.
http://www.youtube.com/watch?v=oEnb_gngagw&feature=player_embedded

This card was very simple to create. If you have some alcohol inks in your stash, pull then out and give them a try. I promise you that you will not only have so much fun, but you will love the results.

As always, thanks for stopping by and have a great weekend!
Kimba :)


HOW-TO Instructions

Step 1: Base card measures 4.25 x 5.5 (Alcohol Ink)
Step 2: Stamp swirl image using Peeled Paint and FireBrick Red.  Spritz the stamp with water and them stamp.  Adhere to card.
Step 3: Punch scallop edge and adhere to card.
Step 4: Punch out snowflakes and add gem stones
Step 5: Stamp word sentiment and adhere to card

Tuesday, October 26, 2010

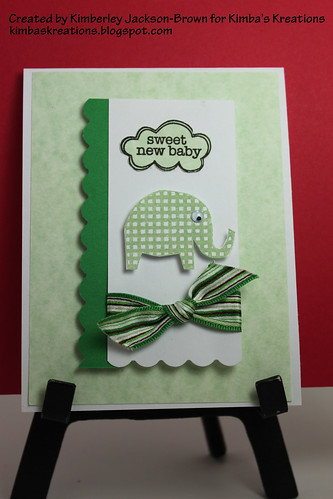
SWEET NEW BABY


SWEET NEW BABY, originally uploaded by kimba7669.

Hey everybody -

Happy Tuesday! Today's card, I stayed away from the holiday theme and created a card that I am sending to someone in one of my Yahoo Groups. It's a card that will be used for a new baby's arrival. I love this stamp set by
HeroArts. It is so sweet. I chose the light green since that is typically used when you don't know the sex of the baby and I can definetly see this card in a pink or blue color.....SO SWEET!

I hope you like the card. Maybe there's someone you know who is expecting a new baby and you can create this card to accompany the gift. I know they would love it!

Well, it's about that time. Thanks so much for stopping by!
Kimba :)


HOW-TO Instructions
Step 1: Base card measures 4.25 x 5.5 (White)
Step 2: 2nd Layer measures 4 x 5.25 (Seafoam Green)
Step 3: Punch Scallop  edge(Green). Cut cardstock and tie ribbon. Attach the card strip to the scallop edge.  Adhere to Base of card.
Step 4: Stamp elephant image and cut out.  Add googlie eye.  Attach using foam dots.
Step 5: Stamp word sentiment.  Cut it out.  Attach using foam dots.

Wednesday, October 20, 2010

It's beginning to look alot like Christmas....


Hello everybody,
Happy Hump today!  The month of October is almost done (can you believe it) and soon Thanksgiving and then Christmas.  Today's card focuses on the Christmas holiday.  This is the time when you are getting those holiday cards ready so that you will be prepared to send them out.  This was a supper easy card to make and I especially like the color of the ornament-I wanted something that would "pop" off the card and I think the yellow does just that.

Thanks for stopping by and have a great Wednesday!
Kimba :)

Friday, October 1, 2010

WELCOME WEEKEND! - It's TGIF!!!!

Hello everyone and welcome to the weekend!!!!

Yay!!! It's raining like crazy here in NYC and has been for the last 3-4 days, but because it's raining and it's also Friday makes me feel soooo good! I can stay in, make some good comfort food, watch some movies and get some crafting done too!

Okay, here is today's card. I loved making this because I got to use my distress inks and I got to created layers of scallops. All I did to color the peacock was to get the different color inks and color it randomly. I like the look. And, I added some bling to make our cute peacock ROCK ON!

As always, thanks for stopping by and enjoy your weekend!
Kimba :)

Monday, April 26, 2010

Happy Mother's Day - Purple Flowers

Hello all-

I hope you had a great weekend. I know that I have been busty making cards for friends and family for Mother's Day. I hope that when you stop by, you are being inspired to start making yours too!

Today's card is pretty simple. I created a row of flowers and then stamped the word sentiment. Quick and easy. I hope you like the card and thanks for stopping by!

Kimba
HOW-TO Instructions


Step 1: Base card measuring 4.25 x 5.5
Step 2: Pattern paper measuring 4 x 5.25 (STRIPES)
Step 3: Scallop edge measuring 5.25 in length. Create scallop edge using Fiskar scallop punch
Step 4: Stamp a row of flowers A

Monday, April 12, 2010

HAPPY MOTHER's DAY!

Happy Monday all...
Hope you had a great weekend!

This card is inspried by all the Mother's Day commercials that I have been seeing regarding ideas on what to give your mom. I decided to start early w/creating Mother's Day cards or the women in my life. I hope you like the card and remember, I am going back to inclding the HOW-TO's s that when you can, you can create the card yourself!

Thanks for stopping by!!!

Kimba :)

HOW-TO Instructions
Step 1: Base card measures 4.25" x 5.5" - (Blue cardstock)
Step 2: 2nd Layer measures 4" x 5.25" - (White Cardstock) - Adhere to Base card.
Step 3: 3rd Layer measures 3.75" x 5" - (Orange Cardstock) Run this through your CuttleBug using the SWISS DOTS folder. Adhere to White cardstock
Step 4: Cut a strip of Green Cardstock measuring 1" x 5" and punch scallop edge. Adhere to Orange cardstock.
Step 5: Stamp 5 Flower images and color in using PrismaColored Pencils. Punch images out using scallop rectangle punch and then add gem snes to the center of each flower.
Step 6: Add foam dots to the flower images and adhere to the card.
Step 7: Stamp Happy Mother's Day sentiment. Tie ribbon on the end and adhere to card.

Wednesday, March 17, 2010

HAPPY ST.PATRICK DAY!!!


Hello all-

Happy St. Patrick's Day everybody!!! here in NYC, every year, there is a parade in midtown that starts at 11am and ends at 5pm. It is also televised for those who prefer to watch it on TV. Today's card i inspired by today's holiday. I created a monochromatic (that means all in one particuliar color) card all in green. Green is my son's favorite color, so he loved this card. I hope you do too!

The stamp is by Stampedous and I colored it in using PrismaColor Coloed Pencils. I also used Ranger's Inkssential's Glossy Accent to add a bit of dimension.

Enjoy your St.Patrick's Day and thanks so much for stopping by!
Kimba :)

Monday, March 8, 2010

SPRING is HERE!!!


Good morning & Happy Monday!

Here in NYC it is a beautiful clear day. Today's high is 58 degrees and I am sooo happy that Spring is here. So, in honor of such a bright, beautiful, sunshining day, I have a created a card to match. I used yellows, greens, black & white. the stamp that I used is a HeroArts Block Stamp - A Real Poppy H2660. I stamped the flower using ColorBox Canary Yellow and I loved the way it came out!

So, I am outta here to run some errands and enjoy this day. Where ever you are, enjoy your day too! Thanks for stopping by!

Kimba :)

Monday, March 1, 2010

Happy March 1st - Spring is coming....


Good Morning all and Happy Mrach 1st!

I can not believe that it's March already. This year is zooming by and I am so looking forward to Spring. Here in NYC, we have had quite a bit of snow and I am just about all snowed out. I want to see the pretty flowers and butterflies!

Today's card is inspired by the spring and flowers. I used a great flower stamp by Stampenous as the focal point of the card. I colored it in using PrismaColor Colored Pencils and then added a layer of Inkessentials Glossy Accents to the edges of each petal. I love the shine and dimension it gives. This Glossy Accents is my NEW favorite thing now...LOL!

I hope you like the card ad I hope it inspires you to get your flower stamps out and get to stamping. Thanks so much for stopping by!

Kimba :)

Monday, February 15, 2010

CAARDVARKS Challenge! - Wedding Card Publication #3


Good Morning all-

Happy Monday,
I am posting one of three more cards that I created for the Caardvarks Wedding Card contest. I hope that you like them. If any of you are interested in How-To's on how to make any of my cards, PLEASE, leave me a comment and I would be more than happy to give you all instructions.

Thanks for stopping by!
Kimba

Monday, December 28, 2009

Happy Monday all!

Hello all -

Today I have something new for you. I created a Chipboard Album and I think that it came out pretty nice. I made it for my sister whose birthday is today. She loves journals...especially handmade ones. So, take a look at it and let me know what you think. One thing that I did learn...using glue warps the chipboard, so when I made this one for her, I used a really strong adhesive & glue dots. Now, i am not sure if the "warp" came from the type of glue I used, but I prefer the adhesive.


Thanks for stopping by!
Kimba :)

Tuesday, August 18, 2009

Green, Pink, & Orange

Hello all-
Here is a Scrapbook Layout that I created using the colors Green, Pink, & Orange. I also used some rubber stamping in the following areas of the layout: the vertical journaling "There's no one like you" is a rubber stamp from HeroArts. The circles that are stamped on the orange & yellow squares, is also a HeroArts Block Stamp. And lastly, the journaling that is below Logan's name comes from several rubber stamps.

I hope that this layout will inspire you to incorporate some stamping on a layout.
Thanks for stopping by!

Kimba :)

Wednesday, August 12, 2009

FLOWER WEEK - HAPPY BIRTHDAY - PrismaColor Colored Pencils

Good morning all...

Happy Hump Day! I have a great card to show you today. This card is a birthday card that I made for a friend. This card was so much fun to make because it involves smething that we all love to do - COLOR!!!! I stamped the flower image and then colored in the flowers using PRISMA COLOR Colored Pencils. After coloring in the image, I used GAMSOL to help smooth out and blend the color in. I loved the way it came out because the card looks so bright and cheerful!

I hope you like the card and pull out those colored pencils and get to coloring! Thanks for stopping by!

Kimba :)