Showing posts with label HeroArts Precious Boy CL264. Show all posts

Tuesday, October 26, 2010

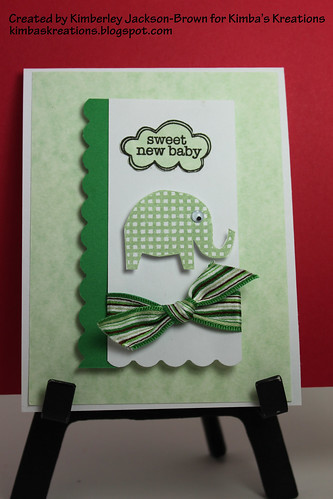
SWEET NEW BABY


SWEET NEW BABY, originally uploaded by kimba7669.

Hey everybody -

Happy Tuesday! Today's card, I stayed away from the holiday theme and created a card that I am sending to someone in one of my Yahoo Groups. It's a card that will be used for a new baby's arrival. I love this stamp set by
HeroArts. It is so sweet. I chose the light green since that is typically used when you don't know the sex of the baby and I can definetly see this card in a pink or blue color.....SO SWEET!

I hope you like the card. Maybe there's someone you know who is expecting a new baby and you can create this card to accompany the gift. I know they would love it!

Well, it's about that time. Thanks so much for stopping by!
Kimba :)


HOW-TO Instructions
Step 1: Base card measures 4.25 x 5.5 (White)
Step 2: 2nd Layer measures 4 x 5.25 (Seafoam Green)
Step 3: Punch Scallop  edge(Green). Cut cardstock and tie ribbon. Attach the card strip to the scallop edge.  Adhere to Base of card.
Step 4: Stamp elephant image and cut out.  Add googlie eye.  Attach using foam dots.
Step 5: Stamp word sentiment.  Cut it out.  Attach using foam dots.

Monday, September 7, 2009

HAPPY LABOR DAY!!!

Hey! Hey! Hey!
I you all are enjoying your Labor Day today! My family and I are headed out to a BBQ right now, so I am going to make this post short & sweet!

Here is a card that I created as part of a challenge. The challenge was creating Masculine cards. Here is my take on it. I hope that you like it. Thanks for stopping by and enjoy your Labor Day!

Kimba :)
PS - The cloud stamp had a word sentiment right smack in the center. In the HOW-TO below, I will explain how I was able to stamp the clouds W/OUT the words. You will look at your stamps in a new light!


HOW-TO Instructions
Step 1: Base card measures 4.25 x 5.5 - Beige
Step 2: Punch out Scallop Edge 3 TIMES using 3 different colored Blue Cardstock. This is to create the waves/water look
Step 3: Stamp BOAT on Beige cardstock. Stamp boat on TWO different orange colored paper/cardstock. Cut out the sail from one of the orange pieces of paper and the base of the boat from the other. Glue the sail and base to the ORIGINAL boat that was stamped on the Beige cardstock. Add foam dots. Set aside.
Step 4: Stamp the CLOUDS - MAKE SURE ONCE YOU STAMP THE CLOUD IMAGE, WITH A BABY WIPE, CAREFULLY WIPE AWAY THE WORD SENTIMENT SO THAT YOU ARE LEFT WITH JUST THE CLOUD. Cut them out. Add foam dots. Set aside.
Step 5: Stamp PLANE on orange cardstock. Cut out and add foam dots. Set aside.
Step 6: Stamp the WORD SENTIMENT and attach a piece if orange string to the top of it. Set aside.
Step 7: Build card!

Tuesday, August 18, 2009

Green, Pink, & Orange

Hello all-
Here is a Scrapbook Layout that I created using the colors Green, Pink, & Orange. I also used some rubber stamping in the following areas of the layout: the vertical journaling "There's no one like you" is a rubber stamp from HeroArts. The circles that are stamped on the orange & yellow squares, is also a HeroArts Block Stamp. And lastly, the journaling that is below Logan's name comes from several rubber stamps.

I hope that this layout will inspire you to incorporate some stamping on a layout.
Thanks for stopping by!

Kimba :)

Thursday, August 6, 2009

Boat Card

Hello all-

Here is my card for today. It is a crad that I created in response to a challenge that I am participating in at www.Heroarts.com. Please, if you get a chance, stop on by that website and visit their blog. It is amazing to say the least!

This card was easy to make. I think the longest part of making this card was heat embossing the image. In any case, enjoy and thanks so much for stopping by!


HOW-TO Instructions

Step 1: Base Card measuring 4.25 x 6
Step 2: The 2nd Layer measures 3.75 x 5.75 - Dark Blue
Step 3: Stamp the SWIRLS w/FLOWERS on to the VERSAMARKR ink pad and then onto the Dark Blue Card Stock.
Step 4: Sprinkle WHITE OPAGUE Embossing Powder over the image and then heat set
Step 5: Let it cool. Attach HEROARTS Gemstones to the centers of all the flowers on the stamped image. Attach this to the base card.
Step 6: Tie Ribbon to the card
Step 7: Stamp the BOAT image onto Light Blue cardstock and onto yellow pattern paper. Cut out the boat's sails from the yellow pattern paper and then adhere the sails to the Light Blue boat image using Pop Dots. Now you have a boat w/yellow sails. Cut out the entire boat and adhere it to the card using foam dots.

Tuesday, August 4, 2009

Hi! Hey! What's Up?

Hey all-

The card for today is i BRIGHT, FUN, and SUPER easy!


HOW-TO Instructions

Step 1: Punch out the TAGS from the Sizzix Die Cut plate in 3 different colors. Set Aside

Step 2: Cut ribbon that matches the colors you are using for the tags. Tie a knot in them. Set aside

Step 3: Stamp the word sentiments on white cardstock and punch out using a circle punch and rounded rectangle punch. Set aside

Step 4: Stamp 3 snails and color them in using the colors used for the tags and ribbons. Place a matching colored gem stone in the center of the snail's shell. Set aside

Step 5: Adhere the word sentiment to the tags. Adhere the ribbons to the tags. Remember, the ribbon on the tag should be different per tag.

Step 6: Adhere the tags onto the base card. Adhere the snails, using foam dots, to the opposite end of each of the tags (the NON-RIBBON SIDE)

Voila! Your done! I hope you have fun trying making this.
Thanks for stopping by!

Kimba :)