Showing posts with label VersaMark Ink. Show all posts

Wednesday, May 25, 2011

CAS-ual Fridays BLING Challenge / The Craft's Meow EMBOSSING Challenge


Hello all...
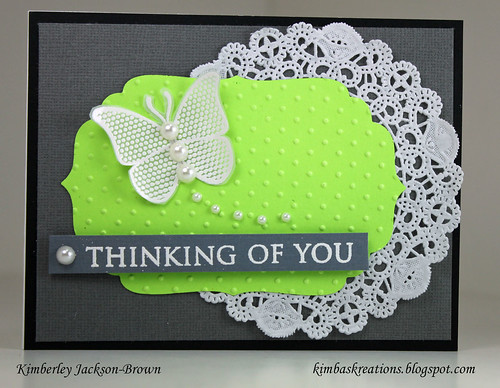
Here is a card that I created for two different challenges.  The first on is CAS-ual Fridays.  This is a great blog with an even greater DT.  They inspire and give great tips and encourage you to be creative.  They are also a weekly challenge blog that is dedicated to to CAS design - CLEAN and SIMPLE.  So, if CAS is your style, this is the blog for you.  Their challenge was to BRING the BLING - and bling could be rhinestones, pearls, glitter, stickles, etc....and this is the card that I created for this challenge.

The second challenge that I am participating in is The Craft's Meow.  This is another great blog.  Their challenge was to use embossing on your project - heat or dry and this is what I came up with.  I dry embossed the green label using my Cuttlebug and Swiss Dots embossing folder and I heat embossed the butterfly and the word sentiment using VersaMark ink and white opaque powder.

Thanks so much for stopping by and have a great day!
Kimba :)


Thursday, August 6, 2009

Boat Card

Hello all-

Here is my card for today. It is a crad that I created in response to a challenge that I am participating in at www.Heroarts.com. Please, if you get a chance, stop on by that website and visit their blog. It is amazing to say the least!

This card was easy to make. I think the longest part of making this card was heat embossing the image. In any case, enjoy and thanks so much for stopping by!


HOW-TO Instructions

Step 1: Base Card measuring 4.25 x 6
Step 2: The 2nd Layer measures 3.75 x 5.75 - Dark Blue
Step 3: Stamp the SWIRLS w/FLOWERS on to the VERSAMARKR ink pad and then onto the Dark Blue Card Stock.
Step 4: Sprinkle WHITE OPAGUE Embossing Powder over the image and then heat set
Step 5: Let it cool. Attach HEROARTS Gemstones to the centers of all the flowers on the stamped image. Attach this to the base card.
Step 6: Tie Ribbon to the card
Step 7: Stamp the BOAT image onto Light Blue cardstock and onto yellow pattern paper. Cut out the boat's sails from the yellow pattern paper and then adhere the sails to the Light Blue boat image using Pop Dots. Now you have a boat w/yellow sails. Cut out the entire boat and adhere it to the card using foam dots.