Friday, October 29, 2010

Joy Christmas Card

Joy Card - October2010B, originally uploaded by kimba7669.

Good Morning all----------

HAPPY TGIF!! HAPPY TGIF!! HAPPY TGIF!!

Can you tell that I am happy and excited that it's Friday??? TeeHee!!! The weekend is here and I have been waiting for it to arrive forever! I have so much stuff to do and today I am up early to get a jump on it!

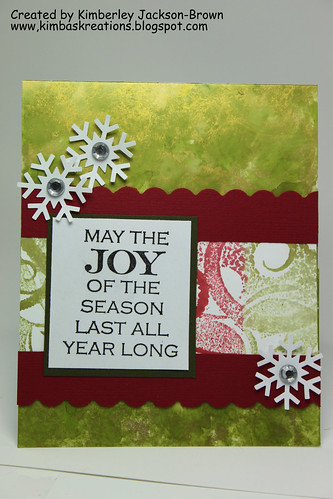
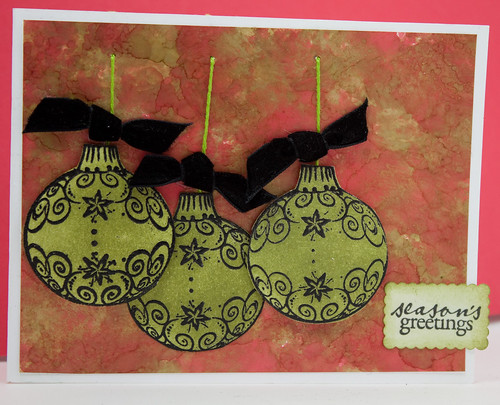
So, today's card is one that I made to submit to a challenge and I love the way it came out. I am just LOVIN', LOVIN', LOVIN' Tim Holtz's Alcohol Inks. I love the process of how they blend once the ink hits the glossy paper and I especially love how you never seem to know what pattern is going to show itself. It's different every time.

On the background of this card, I used Alcohol Ink LETTUCE and GOLD. It gives such a shimmer when the light hits it. Perfect for the holiday season.

The center section, I did a technique that I saw HeroArts' Jennifer McGuire do. I used Tim Holtz's Distress inks. Here's what you do - you ink up the stamp using the Distress Inks. Next you spritz the stamp with water. Instantly, you see the Distress Inks get activated and you stamp the image on your cardstock. The end result is a water-colored image and I love it!!! Here's a link that shows Jennifer doing this technique.
http://www.youtube.com/watch?v=oEnb_gngagw&feature=player_embedded

This card was very simple to create. If you have some alcohol inks in your stash, pull then out and give them a try. I promise you that you will not only have so much fun, but you will love the results.

As always, thanks for stopping by and have a great weekend!
Kimba :)


HOW-TO Instructions

Step 1: Base card measures 4.25 x 5.5 (Alcohol Ink)
Step 2: Stamp swirl image using Peeled Paint and FireBrick Red.  Spritz the stamp with water and them stamp.  Adhere to card.
Step 3: Punch scallop edge and adhere to card.
Step 4: Punch out snowflakes and add gem stones
Step 5: Stamp word sentiment and adhere to card

Thursday, October 28, 2010

Let It Snow! Let It Snow! Let It Snow!

Let It Snow - October2010B, originally uploaded by kimba7669.
Hello everybody!

The weekend is almost here and I can't wait! But for now, it's Thursday and today's card looks so festive. It remind me of Central Park in NYC when the snow covers the trees. So pretty!

This card was super easy to make. See the instructions below, and as always, Thanks for stopping by!

Kimba :)

HOW-TO Instructions
Step 1: Base card measures 4.25 x 5.5 (Red)
Step 2: 2nd layer measures 4 x 5.25 (White) - run this thru the CuttleBug using the Swiss Dots Embossing Folder
Step 3: Stamp the tree image using VersaMark Ink.  Sprinkle on Opaque White Embossing powder and heat set
Step 4: Stamp word sentiment using VersaMark Ink. Emboss.  Punch out and adhere to card.

Tuesday, October 26, 2010

SWEET NEW BABY


SWEET NEW BABY, originally uploaded by kimba7669.

Hey everybody -

Happy Tuesday! Today's card, I stayed away from the holiday theme and created a card that I am sending to someone in one of my Yahoo Groups. It's a card that will be used for a new baby's arrival. I love this stamp set by
HeroArts. It is so sweet. I chose the light green since that is typically used when you don't know the sex of the baby and I can definetly see this card in a pink or blue color.....SO SWEET!

I hope you like the card. Maybe there's someone you know who is expecting a new baby and you can create this card to accompany the gift. I know they would love it!

Well, it's about that time. Thanks so much for stopping by!
Kimba :)


HOW-TO Instructions
Step 1: Base card measures 4.25 x 5.5 (White)
Step 2: 2nd Layer measures 4 x 5.25 (Seafoam Green)
Step 3: Punch Scallop  edge(Green). Cut cardstock and tie ribbon. Attach the card strip to the scallop edge.  Adhere to Base of card.
Step 4: Stamp elephant image and cut out.  Add googlie eye.  Attach using foam dots.
Step 5: Stamp word sentiment.  Cut it out.  Attach using foam dots.

Monday, October 25, 2010

HeroArts Merry Christmas Challenge


Hey everybody-
Happy Monday! I hope you all had a good weekend. The card today is one that I made for HeroArts Monthly Contest. I will also be selling this at my Esty Store, so please stop on by and take a peek. I love Christmas. It is my MOST FAVORITE time of year and I love make cards for this seasons.


Thanks for stopping by!
Kimba :)

HOW-TO Instructions
Step 1: Base measures 4.25 x 5.5 (White)
Step 2: 2nd Layer measures 4 x 5.25 (Provo Craft Christmas Slab 3 Pattern Paper)
Step 3: Adhere frame using foam dots
Step 4: Stamp christmas tree using Stampin Up Gloroious Green. Cut out.
Step 5: Distress the tree using Peeled Paint Distress Inks
Step 6: Add Prima flowers with gemstone
Step 7: Stamp word sentiment. Cut it apart and use Distress Ink Vintage Photo. Add foam dots.

Sunday, October 24, 2010

MARTHA STEWART 50% OFF COUPON at Michaels

Hey everybody....

This is a quick post that I just had to share, and since I am QUEEN of the CARD-MAKING/ALL THINGS CRAFTY ENABLER's ANOYMOUS (TeeHee) I thought that you all would want to know about a great deal.  My sister sent this to me and I would like to Pay-It-Forward and give you a link to a coupon that you can use at your local Michaels Craft Store.  It is for 50% off and Martha Stewart items...but read the fine print on the coupon because there are some exclusions.  I have already  used mine on Saturday.  I got one of her Decorative punches that go around a 12x12 scrapbook page.  The one I got was $17.99 and I got it for $9.....I skipped right on out of Michaels I was so happy!  I think later in the week I am going to try and get some of her glitter packs and that Scoring Board I have been hearing so much about.

Anyhow.....here's the link   http://icoulduseadeal.com/2010/10/michaels-50-off-printable-coupon-for-martha-stewart-crafts.html
If you have problems opening the link, please shoot me over an email at kimba7669@yahoo.com, subject line MARTHA STEWART 50% COUPON and I will resend it right over to you.  Oh yeah...and the best part is that you can print off as many as you like of these coupons!!!!!  I know, I know....I'm sooooo bad!!!

Thanks for stopping by!
Kimba

Thursday, October 21, 2010

Alcohol Ink " Christmas Like " Background

Hello Everyone....

Today's card is one that I enjoyed so much creating. I have had a bunch of the Tim Holtz's Alcohol Inks for quite a while, and have played with them...honestly...about once. When working with these inks, you need to use GLOSSY CARDSTOCK. Another Tim Holtz product that was used in this card was his DISTRESS INK. I used them on the Flourish Ornaments. I stamped the ornament using VersaMark Ink and HEAT embossed it using black powder. Next, I comepletely cover the ornaments with Peeled Paint ink. I love the way they came out!

In any case, thanks so much for stopping by and have a great Thursday!
Kimba :)

Wednesday, October 20, 2010

It's beginning to look alot like Christmas....


Hello everybody,
Happy Hump today!  The month of October is almost done (can you believe it) and soon Thanksgiving and then Christmas.  Today's card focuses on the Christmas holiday.  This is the time when you are getting those holiday cards ready so that you will be prepared to send them out.  This was a supper easy card to make and I especially like the color of the ornament-I wanted something that would "pop" off the card and I think the yellow does just that.

Thanks for stopping by and have a great Wednesday!
Kimba :)

Tuesday, October 19, 2010

Ten Years and THEY NEVER HAD A FIGHT!....Lol!


Hey everybody-
It's Tuesday and here in NYC it's very dark and rainy and chilly. A great day to stay in bed with a cup of hot chocolate and just chill.....but of course....there's no rest for the weary....LOL! This is going to be a quick post because I had lots to do today.
My hubby and I have a couple whose wedding anniversary is today. They have been married for 16 years, but together a total of 21 years. I made her this card because I will be seeing her this weekend. She's a frilly sorta lacy kind of girl, so I tried to pull that in with the doilies. I hope she likes it.

Well, I am off..thanks for stopping by and have a great rest of the day!
Kimba :)


Monday, October 18, 2010

Happy Birthday to you!!!


Hello all-
Happy Monday to you. I am so sorry for the late post, but I was super busy today. I hope that you had a great weekend. I know mine felt like it whizzed on by so fast! There is NOT ENOUGH hours in a day I tell ya!!! We need to start the weekend on Thursday, so that we can actually get a full Friday to do whatever we want! LOL!!! Like my hubby said, " Good Luck with that!"....lol!

Enough of my ranting....today's card is a birthday card that I created for a Yahoo group that I am in. They asked for folks to volunteer to make cards and one of the themes that was needed was birthday cards. Here is mine. I love the way it came out and I think that the elephant is TOO CUTE! I hope you like it and as always, thanks for stopping by!

Kimba :)

HOW-TO Instructions

Step 1: Base measures 4.25 x 5.5
Step 2: 2nd layer measures 4 x 5.25 - PATTERN PAPER
Step 3: Punch a scallop edge measuring 4" and adhere to card
Step 4: Adhere white flowers and add pearl gemstones (* I colored the pearl stone using alcohol inks in a ziplock baggy. If you want directions on how to do that, please email me.)
Step 5: Punch out Scallop square and adhere to card.
Step 6: Stamp elephant and cut out. Add pearl gemstones to splash near trunk
Step 7: Stamp Happy Birthday sentiment at the bottom of card

Monday, October 11, 2010

Here are 1 more cards I submitted to Embellish Magazine


What's Black, White, Grey, and Yellow all over????

Hey Everybody-
Today's card I am especially excited about because someone saw it and commissioned me to make her a set of invitations. It's not the same identical card, but the color palette and style would be the same.
I created this card for Embellish Magazine's contest. They asked that the colors within the card be black, white, grey, and yellow and they wanted background stamping to be highlighted in the card. These colors, for me, I would not ordinarily put them together, but in the end, the look is so classic and clean. Thanks Embellish Magazine for this inspiration as well as showing me a new color combination.

Thanks for stopping by!
Kimba :)

Wednesday, October 6, 2010

Follow your heart...Create

Good morning all-

Happy Wednesday! This week sems to me to be flying by so fast. Two more days, and the weeked will be here. I so love the weekends...don't you?

Today's card was created super fast. The longest part of the card was the heat embossing...lol! One other thing that I did is on the Prima flowers, I stamped it using the HeroArts Friend Definition Cling stamp and added a gem stone.
As always, enjoy the rest of your day and thanks so much for stopping by. Show me some creative love and leave me a comment too!
Kimba :)
HOW-TO Instructions

Step 1: Base measures 4.50 x 6.25 (Kraft) - Stamp HeroArts Cling Dots using VersaMark ink, heat emboss using clear embossing powder
Step 2: Stamp HA Friend Definition image on white cardstock, Distress edges. Distress the entire stamped image using Tim Holtz Spice Marmalade. Tear opposite corners and ink edges.
Step 3: Stamp HA Silhouette Spray on to cardstock in black ink. Adhere to card base.
Step 4: Ink Prima flowers using Spice Marmalade and stamp Prima flowers with the Friend Definition stamp. Add gem stones. Adhere flowers to card.
Step 5: Stamp word sentiment - HA Treasure the Moments Stamp - ink and tear. Add pop dots and adhere to card


Monday, October 4, 2010

No Stress when Distressing...

Hey everybody!
Happy Monday! I hope that you all have a wonderful weekend. I know for me, it just flew by. The weekends arCheck Spellinge always so packed with stuff, that when you finally stop and take a breath, it's already Monday.
I was able to get some stamping done and boy did I have fun. I got to play with some products that I had not used in a long while - Alcohol Inks. I have them on my desk, in a storage drawer, and when I went into the drawer, looking for something else, I said to myself, "Kimba, you HAVE TO make a card using these inks" and that's is how today's card was created. It's the 3rd layer of the card. The finished product came out so nicely, that I plan on creating alot more using is product.

Below, are instructions on how I made the card and I hope that this will inspire you to pull out your alcohol inks and use them to create something awesome....or, better yet, give you a good excuse to go shopping and pick up some inks (wink...wink - I have to enable all of you...it's only fair) from your local craft store.

I hope you like the card, and thanks for stopping by!
Kimba :)


HOW-TO Instructions

Step 1: Base measures 4.50 x 5.75 (BLUE)
Step 2: 2nd Layer measures 4.25 x 5.50 (WHITE)
Step 3: 3rd Layer measures 4 x 5.25 (ALCOHOL INK) - Use GLOSSY CARDSTOCK, and your blender tool, put alcohol inks Lettuce, Latte, and Sail Boat Blue. Adhere to card
Step 4: Stamp Flower Medley onto white cardstock. Ink up stamp using Distress Ink Peeled paint and Broken China, turn woodstamp over and spray the image with water. Stamp image onto cardstock. Distress edges and add pearls to center of flowers.
Step 5: Stamp word image and tie ribbon in a bow


to a video by Jennifer McGuire. She will show you how to create the alcohol background


Friday, October 1, 2010

WELCOME WEEKEND! - It's TGIF!!!!

Hello everyone and welcome to the weekend!!!!

Yay!!! It's raining like crazy here in NYC and has been for the last 3-4 days, but because it's raining and it's also Friday makes me feel soooo good! I can stay in, make some good comfort food, watch some movies and get some crafting done too!

Okay, here is today's card. I loved making this because I got to use my distress inks and I got to created layers of scallops. All I did to color the peacock was to get the different color inks and color it randomly. I like the look. And, I added some bling to make our cute peacock ROCK ON!

As always, thanks for stopping by and enjoy your weekend!
Kimba :)