Showing posts with label Distress Inks Orange Marmalade. Show all posts

Thursday, April 28, 2011

HeroArts Challenge - Layering Technique


Good morning all-

It's Thursday and that only means  - 1 more day til the start of the weekend..WooHoo!!!  I am so tired today...keep reading and you'll know why.

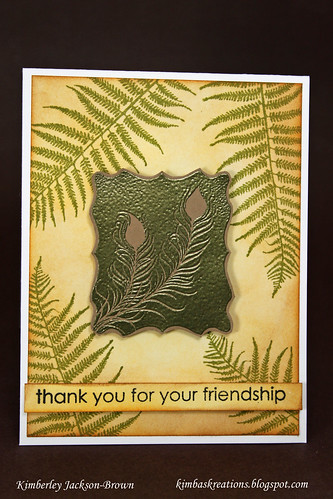
I was up last night,(started at around 11pm) at my crafting desk trying to create this card "in my head" that looked awesome....but of course, it just was not coming together. I tried to follow the sketch I drew, but it was just not happening. I had the stamp and the paper and the embellishments...but when I started inking up my stamp, I just wasn't feelin' it.  Anyway...it was about 1am and I went back to my desk and I picked up this stamp - HeroArts Little Feathers - and all of a sudden I came up with today's card in 15mins - NOW GO FIGURE.....(Kimba hits her head - DUH!) ...and this was not the original card I was trying to make....


Here's what I did. I distressed lightly the white cardstock firs, layering Orange Marmalade and then layering Vintage Photo around the edges. Next, I stamped the SILHOUETTE FERN using Peeled Paint Distress Ink in a random pattern. Lastly, I stamped LITTLE FEATHERS CG202 using VersaMark ink and then heat embossed it using OPAQUE powder - the color is PERIDOT....don't you just love the way it came out??? The details of the feathers are so pretty (if I do say so myself..LOL!)


Lastly, I added pop dots, and stamped a simple sentiment. CAS card....thanks for stopping by....and have a great Thursday!

Kimba


Tuesday, July 28, 2009

Monochromatic Card - ORANGE

Hello all-

Here is the 2nd day of the Monochromatic theme. Today's card color is MY FAVORITE color - Orange. I hope that you like it. Please, leave feedback. I love, love, love to hear from you.

Thanks so much for stopping by!
Kimba :)

HOW-TO Instructions
Step 1: Base card measures 4.25 x 6"
Step 2: The 2nd Layer measures 4 x 5.75" (pattern paper)
Step 3: Attach the Gingham Ribbon to 2nd layer. Attach a scallop border to 2nd layer. Next, attach the entire 2nd layer to the base of the card.
Step 4: Place Orange Gemstones along the Gingham ribbon
Step 5: Stamp image on white cardstock. Use Tim Holtz Orange Marmalade Ink to distress entire image. Attach orange flower in the center of image and place orange gemstone in the center of flower.
Step 6: Attach the stamp image using foam dots

Monday, July 20, 2009

DISTRESS and ALCOHOL INKS - So Much Fun!!!

Hey there all....

I hope you all had a great weekend! I am very excited about this weeks themed cards that I am going to be making for ya! I am totally into Tim Holtz's Distress and Alcohol Inks and I got a chance to play around with them this week....and I can not wait to share the creations.

Here's one of them and the How-To Instructions. Please, make sure you try this one...you will have sooo much fun with this that you won't be able to put it down!

Thanks for stopping by!
Kimba :)
HOW-TO Instructions

Step 1: Base Card measures 4 x 5 1/2 - The White Layer measures 3 3/4 x 5 1/4. Adhere to base card.

Step 2: Stamp HeroArts Image - Swirl with Flowers K5133 with VersaMark Ink. Add clear embossing powder and heat set. Tear this image.

Step 3: Using Distress Inks - Orange Maralade & Blue China - shade the image...

Step 4: After shading the image w/the Distress Ink, take a paper twoel and buff away the ink on the embossed stamp image. The image will start to pop!

Step 5: Using Distress Ink - Frayed Burlap, ink the torn edges

Step 6: Add Pearl Gems to the center of the flowers and stamp word sentiment. Adhere this finished section to the card using foam dots.