Showing posts with label HeroArts Thank You Messages CL142. Show all posts

Tuesday, March 29, 2011

Play Date Cafe Challenge #74


Hello everyone....
How ya'll doing this Tuesday morning?  I am so excited that I just have to share.  My husband's brother's wife just gave birth...this morning to a healthy baby girl.  I don't have anymore info other than she is doing well and her name is Madison!!!  I couldn't be happier for them.  So, stay tune for a "Congratulations on your Baby Girl" card being posted....

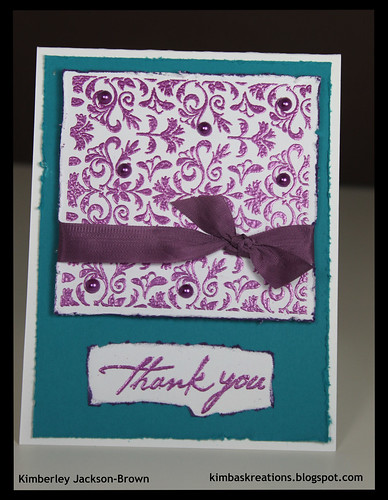
Today's card was created for the Play Date Cafe Challenge.  They give you the colors that can be used within the card but can be interpreted by you in any way you want.  The colors they selected are colors that I wouldn't ordinarily put together, but after creating the card, I see just how pretty the colors are together. 


Thanks so much for stopping by and enjoy the rest of your day!
Kimba :)

HOW-TO Instructions
Step 1: Base card mesures 4.25 x 5.5 - (White)
Step 2 1st Layer measures 4 x 5.25 (Turquoise)
Step 3: Stamp Antique Brocade using VersaMark ink.  Sprinkle purple embossing powder and heat set.  Distress edges
Step 4: Tie ribbon and add faux purple pearls.  Adhere to base card using foam dots
Step 5: Stamp word sentiment using VersaMark Ink and sprinkle purple embossing powder.  Heat set and adhere to card

Monday, September 27, 2010

CAARDVARKS CLEAN & SIMPLE Challenge - Thanks!

Hey everybody and Happy Monday to you!

I am very excited to share with you today's card. I created it for a challenge that Caardvarks is having entitled Clean and Simple. If you get a chance, stop by this blog. It is a great place to get inspired and there are loads of talented people who submit their creations. Anyway, the theme was to create a card that is Clean and Simple. I would describe my style of cards as Clean and Simple - clean lines and symmetry and balance is what I aim for...not sure if I hit it every time (teehee)...
I hope you like the card. I created it using Kraft cardstock...my new favorite color to use now....What I did in terms of the sentiment is that HeroArts has a clear stamp sheet. The one that I used was the Thank You Messages (CL142) and I grouped a bunch of the "thank yous", placed them on my acrylic block and stamped the image. This method is great if you want to create a background...spacing the stamps out, and then randomly stamping. I love the way it came out.

Well, thanks for checking out my card and fingers crossed that I win the challenege. The prize package is wayyyyy cool!

Kimba :)

HOW-TO Instructions
Step 1: Base measures 4.50 x 6.25 - (KRAFT)
Step 2: Cut a piece of Bird Cage pattern paper by Recollections 1 x 6.25. Punch scallop edge. Adhere to card.
Step 3: Tie ribbon
Step 4: Stamp sentiment. Round the OPPOSITE corners. Adhere to card.
Step 5: Create faux stitching

Friday, August 7, 2009

A Card of THANKS!

WOW! Happy TGIF! This week went by so fast for me and now it's the start of the weekend. Here in NYC it is a stunning 80 degrees, sun shining, and not a cloud in the sky! This is definitely a great day to get some crafting done!

Okay, let's get started with out card for today. The card may look like it to a while to make, but it was pretty easy. I hope that you like it. Have a great weekend all and thanks so much for stopping by!


Kimba :)

HOW-TO Instructions

Step 1: Base Card measures 4.25 x 6
Step 2: The 2nd Layers (the 3 panels) - Get coordinating pattern paper. Each measures 1.25 x 4
Step 3: Punch out Scallop Edge on Yellow Cardstock and adhere to the Base Card.
Step 4: Tie Yellow pattern ribbon to the card above the attached scallop edge to create a finished look
Step 5: Stamp the word sentiment on Yellow cardstock. Mat this using the pattern paper you have on your card. Punch out a butterfly, add Pearl Gemstone and attach to card.
Step 6: Punch out a Scallop Square. Set aside.
Step 7: Stamp, on white cardstock the HeroArts 'A Real Poppy' flower TWICE. One of the stamp images, you will punch out and place on top of the already punched out scallop square. The 2nd stamp image, you will cut out the flower, back it w/a foam dot and adhere it exactly on top of stamped flower image to add dimension.
Step 8: Adhere the finished scallop embellishment to the card.